Figure 1
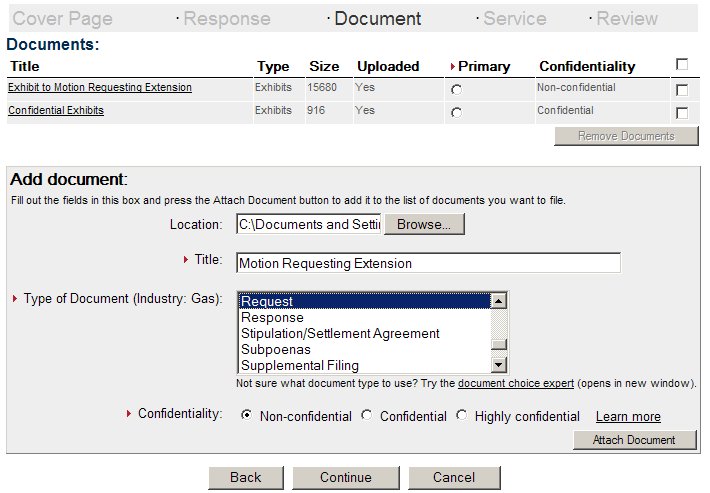
The document panel gives you the ability to add the specific documents
to your filing.Adding Documents
Use the Add Document control to add one document at a time to your filing.
To tell the system which document you want to upload, press the button entitled "Browse...". A standard Windows file dialog appears allowing you to navigate to the location of the file on your computer. Choosing a file and clicking on the Open button automatically fills the location field in with the path of the file you have chosen.
As you add each document, you have the opportunity to specify the document's confidentiality, title and document type.
Fill in each field and when you are sure all the information you have provided is correct, press the Attach Document button (located toward the bottom right hand corner of the Add Document control).
Using this page, you may add as many documents as you wish to the filing. Individual documents may not exceed one hundred mega-bytes in size.
Add Document Fields
| Location | The location of the file on your local file system to be uploaded to the E-Filings server. Use the Browse... button to search for the file. |
| Title | The title of the document. |
| Type of Document | Choose the type of document you are filing from the list. If you aren't sure what type of document you are filing, use the document choice expert to help decide. |
| Confidentiality | Choose one of the increasingly secure options of non-confidential, confidential or highly confidential. The majority of documents you file will be non-confidential. See the help topic concerning confidentiality for more information. |
If you want to review the actual document after you have added it to the filing, you may do so by clicking on the title of the document. The system attempts to display the document in its own window.
Be sure to press the Attach Document button once for each document you want to add to your filing.
Before you press the continue button, be sure to choose the primary document in the filing (if you are only filing one document, you won't need to do this).
Choosing the Right Document Type
If you aren't sure which document type to use, be sure to use the
document choice expert. The document choice expert provides a detailed
description of each document type. Once you have found the type of document
you need to file, clicking on the document type automatically fills in
the correct document type on the Add Document control.Accepted File Formats
E-Filings accepts most file formats, including word documents, images, excel
spreadsheets and many, many others. Each document that you add to the filing
is automatically converted to a PDF (Portable Document File) file. E-Filings
will reject documents that contain viruses, are too big or those that
E-Filings is unable to convert to a PDF.
Navigation Buttons
Navigation buttons located at the bottom of the page allow you to
move from one page to the next and back again. Each button is described
in more detail:| Back | The back button navigates the wizard to the Response Page. |
| Continue | Be sure to choose the primary document before hitting the continue button. Navigates to the Service panel of the wizard. |
| Cancel | Returns to the Filing Center without saving any information. |