Figure 1
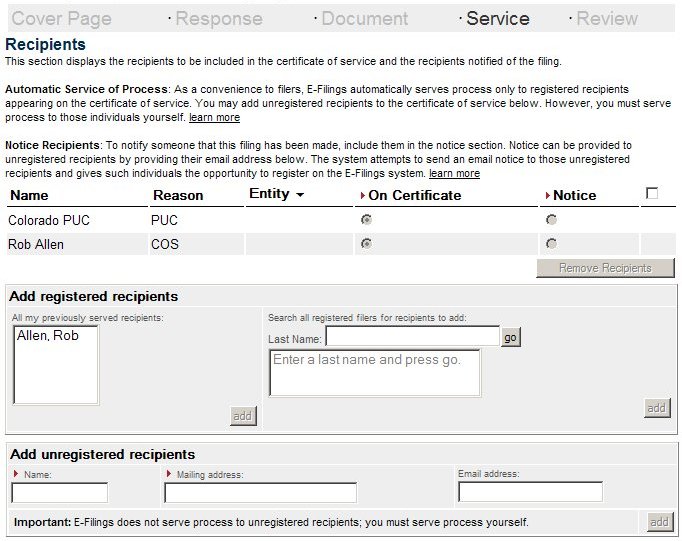
The service panel gives you the ability to build a suitable certificate
of service for your filing.The screen is divided into two main sections. The upper section displays the set of recipients of service. The lower section provides controls for adding three types of recipients to the certificate:
- Recipients you have served previously
- Recipients that are registered on the E-Filings system
- Recipients that are not registered on the E-Filings system.
When you file in an existing proceeding, the system automatically determines who is legally required and authorized to receive service. In this circumstance, your only option is to add recipients to the notice.
Notice that recipients of notice do not remain on the certificate from one filing to the next and must be added each time you make a filing and wish to include a noticee.
Adding Recipients
To add a recipient to the certificate of service you must first determine which of the three
types of recipients the person you wish to add falls into.
- Recipients you have served previously. To add a recipient you have served previously, locate and click on their name on the choice list labeled All my previously serviced recipients and press the add button located to the right of the choice list.
- Recipients that are registered on the E-Filings system. To add a registered recipient that you have not previously served, type part or all of the recipient's last name into the field entitled Last Name and press the button entitled go. You can use the * (asterisk) to specify a wild card. The system will fill the list beneath the last name field with the names of registered users that match your search. Locate and click on those users that you want to include and press the add button located to the right of the choice list.
- Recipients that are not registered on the E-Filings system. To add recipients that have not registered on the E-Filings system, type their name and mailing address in the fields provided and press the add button located in the bottom right hand corner of the Add unregistered recipients control. You may optionally supply the email address of the recipient. If the recipient has registered on E-Filings (based on email address), you will receive a warning that the person has already registered and should be chosen from the list of registered filers.
Removing Recipients
To remove a recipient, click on the box located to the right of recipient's information and
click the Remove Recipients button. You may only remove a recipient that you have added
during the current filing process. On Certificate VS. Notice
Most of the time, the system will determine for you whether a recipient is to be either placed on
the certificate of service or will simply be notified of the filing. Note: users that have
signed up and requested notice when filings like yours are made will receive a notice regardless
of whether you add them to the set of noticees or not.
For each person you add in a new proceeding, you must choose On Certificate or Notice. Do this by clicking on the appropriate radio button for each recipient.
Recipients of Confidential Documents
When you file a confidential or a highly confidential document, an additional field appears
on the list of recipients. For each recipient, you must use the provided drop-down list to
choose one of Mail, Hand, None or Other as the method of service. Note: the E-Filings
system does not allow recipients to view the contents of confidential or highly confidential
documents. If you wish for a recipient to view such content, you must make arrangements for
them to do so yourself.
 Productivity Feature
the system automatically saves a record of registered users that
you have previously served. You can quickly locate and add them to a certificate by choosing
their name from the All my previously serviced recipients list and pressing the add button
located to the right of the choice list.
Navigation Buttons
Navigation buttons located at the bottom of the page allow you to
move from one page to the next and back again. Each button is described
in more detail:| Back | The back button navigates the wizard to the Document Page. |
| Continue | Navigates to the Review panel of the wizard. |
| Cancel | Returns to the Filing Center without saving any information. |